Monday, December 21, 2009

VHD to WIM: from virtual machine to WIM deployment

A lot of topics discuss about the process of converting VIM files to VHD, but very few about VHD to WIM.

Virtual Hard Disk (.vhd) is the file format of virtual machines hard disk drives. Connectix and Microsoft are currently using this technology. You can check the Virtual Hard Disk Image Format Specification for more details.

Windows Imaging Master (.wim, .swm) is the file format for deploying Windows OSes since the XP version.


The goal of this post is to explain how to produce a WIM master file after having prepared a VHD master.


1/ prepare the virtual machine master
- install the OS, the program you want to use
- in case you would like to perform a unattended installation, I advise you to check the Sysprep a Windows 7 Machine - Start to finish post.
- sysprep with appropriate commands


2/ convert the virtual machine VHD to a VIM
2.1/ if you used at least 1 snapshot (avhd): (if not, go to 2.2), we have to produce a single VHD file.
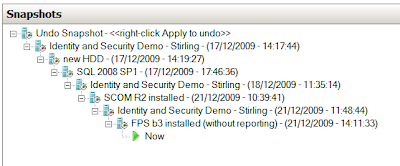
When using snapshots, it creates a tree of virtual machine states. The root node (the root "-" sign) is a VHD, and each icon is a AVHD storing the differences made regarding the parent disk.

In our example, we have a total of 8+1 avhd files. (8 snapshots, and the final state).

The problem is that, on windows 7 / 2008R2, we are currently only able to mount a VHD.

If you do not want to loose your snapshots, you have to perform:
2.1.1/ Virtual machine export
2.1.2/ Virtual machine import

2.1.3/ Snapshots merging
- Click on the root snapshot: delete > snapshot subtree
- wait for the merging operation to finish
- your vhd is now ready to be mounted in your host system!


2.2/ Mount the VHD (as read only) in your host system
- start > Run > diskmgmt.msc
- Action > Attach VHD. Then:
- check Read-Only
- select the vhd we just produced and notice its assignated letter. Let us assume that it has the letter G: assigned.

As a local administrator, open a command prompt:
cd "%programfiles%\Windows AIK\Tools\amd64"
(assuming that your host system is x64 Windows OS, or cd "%programfiles%\Windows AIK\Tools\x86" if it is a x86 one).

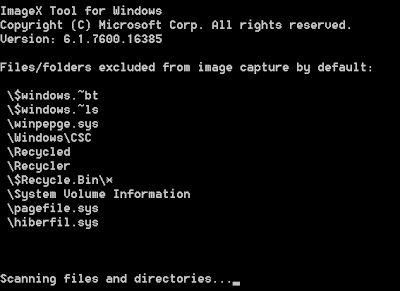
imagex /compress maximum /flags “Ultimate” /capture G: C:\image.wim “Win. 7 Ult. x86 - Off. 2007”
- wait for the process to finish


3/ Configure the WIM server
- tip: the boot.wim is located in the sources folder which is at the root level of the iso.
- the image.wim is the one we just created before


4/ Enjoy your deployment!

The idea beyond this article is to have a virtual machine which we can freely improve, thanks to a snapshot hierarchy. And as soon as a new master is ready, simply publish it as a new Windows Deployment Services entry.

Sunday, December 20, 2009

November 2009 hacking attempts on my websites

As you probably already know, I am maintaining several websites (Hotel-Medicis, Bazar-Discount, Cordes-Aux-Voix, Athletisme-Grenoble).

Every month I check the hacking attempts on these websites at different levels:
- server
- web application

For the month of November 2009, I detected that:
- 35 unsuccessful root logins via ssh (deferred via sshguard)
- 10 unsuccessful attempts of SQL injection have been made (catched by the SQL module of my Car-Online framework)
- 78 unsuccessful attempts of exploring the files stored on the webserver by playing with URLs

I am now starting to think about all the hacks I did not detect...

Wednesday, December 9, 2009

FIM 2010 RC1 update 2

Update 2 for Forefront Identity Manager 2010 RC1 was publicly released yesterday on windowsupdate.
This patch applies to:
- the FIM synchronization service
- the FIM service

Before installing these optional updates:
- stop the FIM service
- stop the FIM synchronization service

Additionaly, you have to apply these updates in the following order:
- FIM 2010 RC1 update 2 for FIM SERVICE
- FIM 2010 RC1 update 2 for FIM SYNCHRONIZATION SERVICE

Since the update 1 failed if we used a non self signed certificate, altough I was not sure it was necessary, I did the temporary certificate replacement before Forefront Identity Manager 2010 RC1 update 1 trick.

It ows the KB977312. You can check details on the Microsoft Support website.
I advise you to read this article on Jorge's blog.


How to install the FIM RC1 2010 Update 2 with a custom certificate:

1. Back up the FIM Service database.
2. Start regedit, and navigate to \HKEY_LOCAL_MACHINE\SYSTEM\CurrentControlSet\Services\FimService. Find the value for CertificateThumbprint, and save it for later use.
3. Uninstall the FIM Service and Portal.
4. Reinstall the RC1 version of the FIM Service and Portal, with the options Re-use existing database and Use self-issued certificate. This allows the FIM Service installer create the certificate.
5. Install FIM 2010 RC1 Update 2.
6. After installation is complete, start regedit, and navigate to the registry key \HKEY_LOCAL_MACHINE\SYSTEM\CurrentControlSet\Services\FimService. Change the value of CertificateThumbprint to the value that you saved previously.
7. Restart the FIM Service.

Friday, November 20, 2009

Windows 2008 R2 Administration tools


If you are running a Windows 7, you probably heard about the Remote Administration Tools for Windows 7. But what about the server version?

Well guys running a Windows 2008 R2 OS do have this pretty powerfull powershell module called "ServerManager":


Import-Module ServerManager
$mod = Get-Module ServerManager
$mod.ExportedCmdlets


When we run the Get-WindowsFeature cmdlet, a list of all the Windows features that could be installed is shown. Each checked box means the feature is alredy installed.


In particular, we do have a list of windows features, which their name is prefixed with "RSAT", which means Remote Server Administration Tools. And it is the same features than the package mentionned above for Windows 7.


I needed to install only the Hyper-V administration tools:

Add-WindowsFeature RSAT-Hyper-V


Done!


I am now able to list my virtual machines:


Wednesday, November 18, 2009

FIM - execute management agents run profiles with powershell

Here is a script I created which permits an easy automatic execution of certain FIM MA run profiles.

Here is an example of output:


And here is the source code:
------------------------
# @author: Fabien Duchene
# @mail: fabien.duchene1 **at** googlemail.com

############
# PARAMETERS
############
$params_ComputerName = "." # "." is the current computer
$params_delayBetweenExecs = 30 #delay between each execution, in seconds
$params_numOfExecs = 0 #Number of executions 0 for infinite
$params_runProfilesOrder =
@(
@{
type="Forefront Identity Management (FIM)";
profilesToRun=@("Full Import";"Full Synchronization");
};
@{
type="Active Directory";
profilesToRun=@("Full Import";"Full Synchronization";"Export");
};
);

############
# FUNCTIONS
############
$line = "-----------------------------"
function Write-Output-Banner([string]$msg) {
Write-Output $line,("- "+$msg),$line
}


############
# DATAS
############

$MAs = @(get-wmiobject -class "MIIS_ManagementAgent" -namespace "root

\MicrosoftIdentityIntegrationServer" -computername $params_ComputerName)
$numOfExecDone = 0


############
# PROGRAM
############
do {
Write-Output-Banner("Execution #:"+(++$numOfExecDone))
foreach($MATypeNRun in $params_runProfilesOrder) {
$found = $false;
foreach($MA in $MAS) {

if(!$found) {
if($MA.Type.Equals($MATypeNRun.type)) {
$found=$true;
Write-Output-Banner("MA: "+$MA.Type)
foreach($profileName in $MATypeNRun.profilesToRun) {
Write-Output (" "+$profileName)," -> starting"
$datetimeBefore = Get-Date;
$result = $MA.Execute($profileName);
$datetimeAfter = Get-Date;
$duration = $datetimeAfter - $datetimeBefore;
if("success".Equals($result.ReturnValue)){
$msg = "done. Duration: "+$duration.Hours

+":"+$duration.Minutes+":"+$duration.Seconds
} else { $msg = "Error: "+$result }

Write-Output (" -> "+$msg)
}
}
}
}
if(!$found) { Write-Output ("Not found MA type :"+$MATypeNRun.type); }
}

$continue = ($params_numOfExecs -EQ 0) -OR ($numOfExecDone -lt $params_numOfExecs)
if($continue) {
Write-Output-Banner("Sleeping "+$params_delayBetweenExecs+" seconds")
Start-Sleep -s $params_delayBetweenExecs
}
} while($continue)

Sunday, November 15, 2009

Mac OS X: automator: create a new file

In a Windows OS, it is really simple to create a new text file: right-click > New > Text file.

On my dear Macbook Pro, it is still not out-of-the-box.
Hopefully Automator is here to fill the gap.Please note that this method does not require additional software. Only standard Mac OS X components are used.

First let's have a look at the final result:

1/ Right click on the folder in which you want to create a new file, and select "New file"


2/ Type the name of the file. For example: New file.txt or New file.docx


3/ The file is automatically created inside the folder we specified before and after opened in your favorite editor.


Now let's integrate this to your Mac OS X system.

- First method. the easy one:
- download the automator workflow. It is stored on my skydrive: Mac OS X Create a new file
- install it on your mac: put this file into the ~/Library/Services/ folder
- open it. (it will be opened within Automator)
- Press Cmd+S or click File > Save to register it within the Contextual menu
- Close automator

- Second method. Create an automator workflow according to these instructions:
- Launch Automator.app located in the Applications folder.
- Create a new Service


- File > Save or Cmd + S

- Here is an overview of the workflow:


As you can see:
- this Service Workflow receives Folder as input and is only available in Finder
- we will also need 2 variables: "Filename" and "Path"

Here is the detail of the workflow:
- Once this is done, just press Cmd + S to save it and register this service within the Finder.app


Enjoy this new file creation!

Saturday, November 14, 2009

Disable Exchange 2010 arbitration mailboxes

For the purpose of my Forefront Identity Manager 2010 RC1, I had to use to Exchange 2007 instead of Exchange 2010 I was using (because at this stage FIM RC1 does not yet support Exchange 2010, but this is planned).

Here are the steps to achieve this:

- First you have to disable all users mailboxes in the Exchange 2010 Management console.

- Then you have to remove the Arbitration mailboxes.
Here is the script I created to remove them:

Foreach($mbdb in Get-MailboxDatabase) {
$mailboxes = Get-Mailbox $mbdb.Name -Arbitration
$mailboxes Disable-Mailbox -Arbitration
$mailboxes Remove-Mailbox -Arbitration -RemoveLastArbitrationMailboxAllowed
}


NOTE: (please add a "pipe" after the two last $mailboxes. This stupid blogspot does remove them!)

For more details about arbitration mailboxes, please check this blog: http://chrislehr.com/2009/10/exchange-2010-what-is-arbitration.htm

Monday, November 2, 2009

Forefront Identity Manager 2010 CM: errors and solutions

Unable to check CA in Edit Profile template


Something is wrong with the SQL connection between the CA Exit Module and the SQL Server.
Try to check the password if using SQL Auth. Try to check kerberos' spn elsewise.
Check log: Application and Services Logs > FIM Certificate Management
Restart AD CS, and check 10 seconds later if any warning is raised inside that log.

Value cannot be null. Parameter name byte


If you installed manually certificates in agents store, you have to fill certificate hashes in web.config. Please see Installation > Edit the web.config
Open the web.config file of certificatemanagement.
Search for "Hash", and check that the hash is the one of the fim cm agent certificate.


Base CSP smart card self-service control is not installed or the current site is not specified in the allowed sites list by your Administrator. Please contact your system Administrator. Additional information: Automation server can't create object


If you are on a x64 system, please install FIM CM x64 and user Internet explorer 64 bits.

FIM CM: while reading the smart card


Client encountered an unexpected error while trying to communicate with the server.
Error number: -2146828218
Error description: Permission denied


If using v3 certificate templates for the agents (windows 2008) instead of v2 (win. 2003)
Then the following errors will appear.


Currently, FIM 2010 RC1 CM only does support v2 templates.
Not sure if for RTM any improvments will be made.
Please note that this event is related to the following ones:

Windows Logs > Security > Failed login - Key Migration failed


Event ID 5059. Key operation migration failed
clmAgent ; User key ; RSA ; import of persistent cryptographic key 0x80090029 The requested operation is not supported;----------------------------------
Key migration operation.
...
Cryptographic Parameters:Provider Name: Microsoft Software Key Storage ProviderAlgorithm Name: RSA

...Additional Information:Operation: Import of persistent cryptographic key.Return Code: 0x80090029
----------------------------------

Consequences:
- When performing an enroll request on behalf of another user: Data at the root level is invalid. Line 1, position 1
- When executing a software certificate enroll: Invalid provider type specified.
Check http://www.apollojack.com/2009/06/invalid-provider-type-specified.html

Tuesday, October 27, 2009

FIM 2010 CM - configuration

Installation


FIM Server

Install FIM Certificate Management

Please see: the technet article for Forefront Identity Manager - Certificate Management

Prepare for FIM CM setup
1. Modify the Active Directory Schema: Run D:\Certificate Management\x64\Schema\ModifySchema.vbs
2. servermanagercmd -i net-framework web-server web-asp-net
3. Create a User template for FIM CM agent:
- AD CS > Certificate templates
- Duplicate the template "User" > Windows 2008 server template type to "UserFIMAgent"
- Subject Name: Uncheck "Email name", and "Include e-mail in subject name"
4. Allow the PKI to issue following templates:
- Key Recovery Agent
- UserFIMAgent
- Enrollment Agent
5. Publish the spn in the AD:
setspn -A HTTP/fim-dc fim-dc
setspn -A HTTP/fim-dc.contoso.com fim-dc


Run the FIM CM setup

- Virtual Folder: CertificateManagement


Configure FIM CM

- Run Certificate Management config Wizard-
- SQL: FIM-SHAREPOINT\FIMINSTANCE
- templates: UserFIM


Fim client

Install the Forefront Identity Manager CM Client
FIM Websites: fim-dc.contoso.com;fim-dc


Configuration


AD DS:


Create FIM User groups
- FIMcmAdministrators: cyrilv ; administrator
- FIMcmCertMgrs: FIMcmAdministrators ; pascals
- FIMcmUsers: FIMcmCertMgrs ; fabiend ; youssefz


1. SCP permissions
- View > Advanced Features
- contoso.com > System > Microsoft > Certificate Lifecycle Manager > FIM-DC
- grant FIMcmUsers: Read
- grant FIMcertMgrs : CLM Audit and CLM Request Enroll

2. Users and groups permissions
- FIMcmUsers:
- grant FIM CM Request Enroll for SELF and for FIMcmCertMgrs

3. Policy template permissions
- create a new Smart card template: Contoso FIM smart card policy template
- grant FIMcmUsers and FIMcmCertMgrs the permission to Enroll on "Contoso

4. PKI templates:
- grant FIMcmUsers READ and ENROLL rights on the templates issued in Contoso FIM smart card card policy template


Contoso smart card profile template

- http://fim-dc/certificatemanagement/ as CONTOSO\Administrator
- Administration > Manage profile templates
- duplicate the FIM default smart card template
- Enroll policy: grant FIMcmUsers the Workflow initiate request right
- choose the Certificate templates to enroll
- foreach of them: grant FIMcmUsers the right to Enroll on ADCS> Certificates Templates


FIM CM is only supported on Windows Server 2003 or 2008 enterprise (at least for now)

The Card Management functionnality of FIM is only able to run on Windows Server 2003 or Server 2008 computers, not on Windows Server 2008 R2 - at least on this RC1 version-.


FIM CM configuration error: cannot impersonate a user
You have to set the UserFIM template to be less restrictive:
- remove email


Base CSP smart card self-service control is not installed


When loading the FIM CM http://fim-dc.contoso.com/CertificateManagement/ it shows a .NET SQL Connection timeout
Check that the SQL spn is correctly registred:
setspn -l Contoso\SQLsvc
if no result is present, then type:
setspn -a MSSQL/fim-sharepoint:1433 Contoso\SQLsvc
setspn -a MSSQL/fim-sharepoint.contoso.com:1433 Contoso\SQLsvc

If the MS SQL spn is alreday registred, then increase the timeout:
- Server Manager > AD CS > Right clic on CA > propreties > Exit Module > Fim CM Exit Module > Proprieties
- increase the Connect Timeout

Exchange 2010: Allow SMTP relaying

Some old fashioned programs require to send mail without any form of authentication.
I will show you how to set up a SMTP relay with Exchange 2010 for all mail coming from a specific host.

Topology:
- fim-dc: 192.168.6.1
- fim-exchange: 192.168.6.100 (Exchange 2010 installed)

We want to allow all mail sent from fim-dc to be accepted like any other "normal" mail.

Here are the steps to achieve this goal:

- launch the Exchange management console

- in the Server Configuration > Hub Transport, create a new Receive connector


- give the receive connector a name:


- if you want to do any ip filtering on the receiving interface, fill the correct ip (here we would only allow mail to be received on the 192.168.6.100 ip)


- define the remote ip from where we want to relay all SMTP traffic (in our case: 192.168.6.1)


- then click on "New", a powershell command is run. The receive connector is now created.


- we now have to disable all authentication on that receive connector: Right click on its name > propreties > Authentication, and then uncheck all the boxes.


- then we have to grant the Anonymous users the right to connect, in order to send mail to the transport hub.


- done!

Now any mail coming from 192.168.6.1 to 192.168.6.100 will be relayed using SMTP relaying in Exchange 2010!

Thursday, October 22, 2009

List permissions on Active Directory objects

Here is a common need:
" List the permissions for a specific user / security group on a specific Active Directory object. "

You probably already know the dsacls command.
But let us face it: it is too much verbose and hard to filter.

Powershell is the key, once more.
On the Indeted! blog, the author explains us its Get-DsAcl powershell implementation.

Here is an example to display the FIMcmCertmgrs rights on the objects named FIMcmUsers : (which in our case is a security group):


Get-DSAcl -searchRoot "DC=contoso,DC=com" -LdapFilter "(name=FIMcmUsers)" select-string FIMcmCertmgrs

Output:

Monday, October 19, 2009

Microsoft SQL Server: usefull TCP and UDP ports

If you would have to open only 2 ports in your firewall for Microsoft SQL Server to work, it would be:

- inbound TCP 1433: Authenticated SQL inbound connections
- inbound UDP 1434: Unauthenticated server browser queries

For more information, please check Configure the Firewall to allow SQL Server access article on Technet.

Saturday, October 17, 2009

VB RAP test : Forefront Protection engine is improving!

Virus Bulletin, the reference for comparing antivirus solutions, just released its latest VB RAP test results from Apr.09 to Oct. 09.

Microsoft Forefront engine is performing each time better. Comparing to the last RAP test, Forefront engine was
- Proactive detection: 3rd on 37 selected ones and is now 2nd on 38 ones!
- Reactive detection: 13th on 37 selected ones and is now 9th on 38 ones!


Remind that Microsoft Forefront engine is used in several products of Microsoft Forefront Protection Suite:
- Forefront EndPoint Protection 2010
- Forefront Protection 2010 for Exchange servers
- Forefront Protection 2010 for Sharepoint

For more details, check Microsoft Forefront official website

Ensimag - partner network day - presenting my Microsoft internship in IT Security

The Grenoble INP Ensimag's Partner network day happened on the last thursday October 15th 2009.

I described my final project at Microsoft about Forefront Protection Suite and Forefront Identity Manager to some Ensimag students interested in IT Security.
Feel free to download this overview of Fabien Duchene's Final Study Project at Microsoft(french).

Microsoft has many offers for computer science students.
Please check the Microsoft France internships website and the Microsoft careers website.

Tuesday, October 13, 2009

Exchange 2010 RC1 on Windows 2008 R2: error 2147504141

13/10/2009 - UPDATE: on Exchange 2010 RTM, this problem was solved.

As you probably know, Exchange 2007 refused to install if we disabled IPv6. Well Exchange 2010 RC1 did refuse to install if I did not disable it! Argh!

I encountered the error "The execution of: “$error.Clear(); install-ExsetdataAtom -AtomName SMTP -DomainController $RoleDomainController”, generated the following error: “An error occurred with error code ‘2147504141′ and message ‘The property cannot be found in the cache.’.”

The most relevant topic on that 2147504141 Exchange 2010 RC1 setup error is on technet.


Solution: The trick is that you HAVE to disable IPv6 BEFORE starting any Exchange 2010 RC1 setup. This is a known KB952842. Hopefully with virtualization, it is now easier to take a snapshot before starting anything critical.

The answer came from an italian guy's blog post: An error occurred with error code ‘2147504141′

Friday, October 9, 2009

Forefront Identity Manager 2010 RC1 platform

These last few days I have been busy configuring my Forefront Identity Manager 2010 RC1 demonstration platform.


Forefront Identity Manager

FIM, formerly know as "ILM 2" is the Microsoft solution for managing identity in a corporate. FIM 2010 provides IT administrators the ability to delegate administration and creating workflows for common administrative tasks. In addition, FIM 2010 gives to end-users the ability to manage their own identity without the need to call IT service.


Topology

A picture is more efficient than a long speech:


Software

Here are the software requirements for a FIM 2010 architecture:
- Windows 2008 (standard for FIM Service and Portal, Password Synchronization, and enterprise for Certificate Management)
- Active Directory Domain (at least 2003)
- a PKI
- IIS 6.0
- Sharepoint 2007
- Exchange 2007
- SQL Server 2008

And the software I used :
- Windows 2008 R2 standard and 2008 enterprise
- Active Directory Domain Services
- Active Directory Certificate Services
- IIS 7.0
- Sharepoint 2007 SP2
- Exchange 2010 RC1
- SQL Server 2008 SP1
- Forefront Identity Manager 2010 RC1


Steps

FIM Server:


Install Windows 2008 Enterprise


Install Active Directory Domain Services AD DS


Install Active Directory Certificate Services AD CS
Configure PKI so that all servers autoenroll the website and computer certificate templates.


FIM Exchange:

Install Windows 2008 R2
Exchange 2010 pre-requesites
Please have a look at Exchange 2010 RC1/RTM Software Pre-requisites

Install Exchange 2010 RTM
Setup a receive connector allowing SMTP relaying from FIM-DC
Please see How to allow SMTP relaying in Exchange


FIM Sharepoint
Please see the Technet FIM Installation Guide


Install Windows 2008 R2


Sharepoint 2010 requirements
.Net Framework 3.5.1


Install SQL Server 2008 + SP1


- one instance for FIM with Full-Text search enabled: FIMINSTANCE
- one instance for Sharepoint with FTS: MOSSINSTANCE
- after these installs, apply SP1

Install Sharepoint 2007 SP2
- Database server: FIM-SHAREPOINT\MOSSINSTANCE
- User: CONTOSO\SqlUser
- Create a default site collection
- create a default site in that collection


Final steps

- Install and configure Forefront Identity Manager 2010 RC1 Certificate Management


Major experienced problems

Sharepoint Server 2007: Service Pack 2 needed for Windows 2008 R2
Everything is explained on the Sharepoint blog: Install Microsoft Office Sharepoint Server 2007 on Windows Server 2008 R2

Exchange 2010 RC1 on Windows 2008 R2
When I used the RC1 of Exchange 2010, I had some problems. Please see my post on Exchange 2010 RC1 on Windows 2008 R2: error 2147504141 .
Please note that with Exchange 2010 RTM, everything went fine.

Sunday, September 6, 2009

Is the scared leopard hiding in the snow?

With the worldwide public availability of Mac OS X Snow Leopard since Aug. 28th 2009, a lot of Mac users could not prevent themselves from stepping into the train. "I don't know if it is worth these 29$, but since I'm a geek, I'm definitely going to buy it!" told me a co-worker of mine.

Enthusiastic people, okay. However, from a user point of view - since I am writing this post from 10.6 - very few new features were added, so I could not stop wondering: what about Snow Leopard's security features?


ANTIVIRUS / ANTISPYWARE

Because of the growing Apple's market, it becomes more and more sensible to hackers' attacks. And despite latest Apple's ads claiming that Macs do not suffer from viruses, Snow Leopard now has an integrated antivirus software. However this is a very very basic protection. Let's have a look at its virus definitions:
/System/Library/CoreServices/CoreTypes.bundle/Contents/Resources/XProtect.plist
It is a XML file containing virus definitions for:
- OSX.Iservice
- OSX.RSPlug.A
.. and that's all!

Only 2 trojans signatures? Come on Apple guys, don't you know that there is hundreds of viruses targeting your platform? (it's not a new fact: on Feb 16th 2006, the first Mac OS X virus was discovered. Older versions of Mac OS were suffering virus attacks since 1998, according to Symantec news report ).

ROOTKITS

Since the integrated antivirus only contains 2 definitions, do not expect any rootkit protection to be part of Snow Leopard! Mac OS X rootkits is a quickly growing market. One of the most famous is the one integrated inside a P2P downloadable version of iPhoto 09.
An interesting article about Mac OS X rootkits is on Dino dai Zovi's blog, who presented this topic at the BlackHat USA 2009.


FIREWALL


Since the very first release of Mac OS X 10.4, a firewall is integrated. However - and this is still the case in 10.6 - it is turned off by default! A dangerous choice, because a lot of Mac users have probably not even turned it on yet!
It is nothing else than a graphical interface for ipfw, the BSD firewall. But, from a user point of view, I still prefer the Windows 7 graphical firewall which provides a deeper overview and flexibility.

DATA / DISK ENCRYPTION

FileVault home folder encryption is present since 10.4 Tiger. However, keep in mind that FileVault is sensible to cold boot attacks (which consists in freezing the RAM so that the bits do not "disappear" from the memory. And since for performance, encryption keys are often stored in the RAM for performance issues, a thief can easily dump the memory content and retrieve the encryption key). On the other side, a Windows BitLocker drive encryption with a two factor authentication like TPM+PIN is definitely harder to retrieve.

DIVERSE

Snow Leopard also adds:
- Executive Disable which uses the processor NX_Bit to prevent RAM datas zones from being executed. This feature is also known on Windows as Data Execution Prevention and was implemented on Windows XP. However, for such a protection to be fully effective, it has to be implemented with Address Space Layout Randomization. Which is not the case right now.

More starting points are on this very interesting Dino Dai Zovi's Zdnet article.


Finally, there's not a lot of juicy features for this 10.6 release of the Mac OS X operating system. Several bloggers wrote that Apple is going in the right direction. I personally believe that they first should focus on according their marketing strategy with their technical one. Because by always telling people that there is no possible security issues on Macs, they can blind the classic user who will not care at all about some basic security concepts.

I advise you to read this interesting Brian X. Chen's article about "Snow Leopard being less secure than Windows 7, but still safer".

But for how long will this last?

Monday, August 31, 2009

Am I to the dark side of the force?


The other day I was talking with a friend of mine about my current job. When I told him I was currently working in the french IT Security dept of the Redmond firm, he suddenly told me "ouch, you now belong to the dark side of the force".

Let us face it: today's IT students are really close-minded when it comes about operating systems! Because three days after, another friend of mine gave me kind of the same speech about the differences between windows and linux, thinking he was teaching me what is a unix. You just have to know that I have been using linux and windows - for nearly 7 years for the first one, and 15 years for the second one- to imagine how it is embarassing when people tell you "you know, it is really better, more secure..." (I just cut the classic arguments in favor of linux, because hearing the same -wrong- ideas over and over is starting to make me feel nautious).


The day after, one of my co-worker -who used to be an IT architecture teacher- told me "today's students do not know anything about Windows. They just conceive it as a software they download and use illegally. Furthermore they do not have any idea about what is an Active Directory domain controller, meanwhile they are used to the bash shell!"

It just makes me wonder: Would it be their teachers' fault?

I am using a Macbook Pro and a Windows laptop every day. I have 4 servers in my hometown, several of them running debian linux. To sum up, I know enought about the differences between these OS architecture and user experience to be able to judge them. So let us face it: Linux is far from being perfect, so is Windows, so is Mac OS. They are just different.

They all have they pros and contras, but let us just focus on the IT security field. A report published during the first half of 2008 indicated that vulnerabilities found in Mac OS X 10.5 -on that same period of time- were more than 5 times more important than the ones found for Windows Vista during the same period and using the same criterias!


Finally I was just wondering: if Windows would be so bad, why would 90% of the computer client market be hosting that OS?

Thursday, August 20, 2009

Would you like to have a NAP?

In our days, we experience more and more deeply the following feeling: we need to be permanently connected to everything. It is surfing over the Internet, reading work emails at home, or even accessing an intranet during a trip. Let us assume that you are an IT administrator. On one hand you have to open more and more gates - for the users to be able to use these services - however on the other hand you have to face complex and sophisticated threats.

This dilemna already led us to a point where the firewall on the internal gateway is not enough. Just think about the following laptop scenario. The user has a remote VPN access thanks to which he is able to connect to the corporation intranet. Then the laptop gets infected. Since most of IT network administrators currently define network policy by topology, the laptop has a full network access and therefore is able infect other computers in the domain. And this is mainly because it is connected to the VPN, which is bypassing the firewall, as shown on this picture.


We do have a REAL PROBLEM: how to enforce the network security regardless of the location of the computer?

And here comes Microsoft's answer: NAP and UAG. (altough I will only blog about NAP in this post).

You probably already guessed it, NAP actually stands for Network Access Protection. This technology - also called the "network health layer" - aims at providing a controlled network access regarding of the "Health State" of the computers. Depending of its health status (a parameter defined by the administrator, regarding to rules like "the client firewall is on", "the client antivirus has the latests available definitions", "all important and critical windows security updates have been made"), it will have a full or limited network access.

In case of restricted access, we can define "remediations servers". A client with limited access will still be able to communicate with these servers (for instance in order to install updates via Windows Server Update Services, Windows Update, or the antivirus definitions websites). The goal is to fix the health state of that computer for it to be healthy, and then be able to access the full network.


There are 5 methods to enforce the network access: DHCP, VPN, 802.1x, IPSec or TS.

In a future post, we will study more precisely this mechanism, and especially analize some possible hacks of a Network Access Protection infrastructure.

If you are interested in knowing more about Network Access Protection, just check the previous link on technet.

Wednesday, August 12, 2009

Big BROWSER is watching you!


As the world goes on, so does the technological control on our lives. We constantly have less and less privacy because of technology "improvements". Since a several years, locating quite precisely a person only thanks to its relative gsm position is a reality, and best of breed our ISP are now forced to reveal PII (Private Identity Information) about any Internet user they serve!

IPRED in Sweden, Hadopi in France,... thinking that using the Internet anonymously is belonging each day more to a dream world than to the reality. As a protest act, ThePirateBay.org set up an anonymous proxy. Called IPredator, this service allows users to connect via a classic PPTP VPN connection, and then surf anonymously only by paying a pay a tiny monthly fee (something like 7$/month). A smart way to fight - at their scale - for more privacy over the Internet, but I really do wonder if anyone is able to fight against the pressure of worldwide corporations owning dozen of thousand of digital media copyrights.

Because actually the jungle rule does still applies...

Monday, August 10, 2009

Club-Internet or the bad Wireless student..


Club-Internet, a french ISP - currently owned by Neuf Telecom which is itself currently owned by SFR (french Vodafone) - sold a lot of TECOM wireless Access Points.

On most of Hitachi and Tecom AP, the default WEP key is a result of a SHA-1 hash of the WEP SSID! The ISP offers a windows utility "WEPTool.exe" to compute this function and get the default WEP key: WEPTool website

That is why it is even easier to access these kind of wireless network than cracking the corresponding WEP network (with tools like aircrack)!!

Altough it could lead to a "simple" installation for a newbie, it seems like a huge security issue on the default configuration.

Sunday, August 9, 2009

The quieter you become the more you can hear.


As the first ticket on this IT security related blog, I would like you to think about this quote from Mr Baba Ram Dass, a spiritual teacher from Boston, USA.

"The quieter you become, the more you can hear" is a general assumption that could very well be applied to the field of IT related security.

Think twice about it:
- wireless hackers who put their cards in monitoring mode to check for network characteristics, and then perform an appropriate attack
- information stealing malware which create an https tunnel to send found information while the common firewall will think of a legitimate web browsing