Monday, December 21, 2009

VHD to WIM: from virtual machine to WIM deployment

A lot of topics discuss about the process of converting VIM files to VHD, but very few about VHD to WIM.

Virtual Hard Disk (.vhd) is the file format of virtual machines hard disk drives. Connectix and Microsoft are currently using this technology. You can check the Virtual Hard Disk Image Format Specification for more details.

Windows Imaging Master (.wim, .swm) is the file format for deploying Windows OSes since the XP version.


The goal of this post is to explain how to produce a WIM master file after having prepared a VHD master.


1/ prepare the virtual machine master
- install the OS, the program you want to use
- in case you would like to perform a unattended installation, I advise you to check the Sysprep a Windows 7 Machine - Start to finish post.
- sysprep with appropriate commands


2/ convert the virtual machine VHD to a VIM
2.1/ if you used at least 1 snapshot (avhd): (if not, go to 2.2), we have to produce a single VHD file.
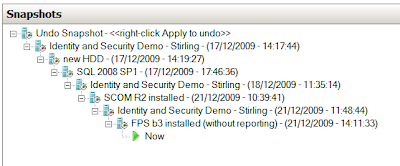
When using snapshots, it creates a tree of virtual machine states. The root node (the root "-" sign) is a VHD, and each icon is a AVHD storing the differences made regarding the parent disk.

In our example, we have a total of 8+1 avhd files. (8 snapshots, and the final state).

The problem is that, on windows 7 / 2008R2, we are currently only able to mount a VHD.

If you do not want to loose your snapshots, you have to perform:
2.1.1/ Virtual machine export
2.1.2/ Virtual machine import

2.1.3/ Snapshots merging
- Click on the root snapshot: delete > snapshot subtree
- wait for the merging operation to finish
- your vhd is now ready to be mounted in your host system!


2.2/ Mount the VHD (as read only) in your host system
- start > Run > diskmgmt.msc
- Action > Attach VHD. Then:
- check Read-Only
- select the vhd we just produced and notice its assignated letter. Let us assume that it has the letter G: assigned.

As a local administrator, open a command prompt:
cd "%programfiles%\Windows AIK\Tools\amd64"
(assuming that your host system is x64 Windows OS, or cd "%programfiles%\Windows AIK\Tools\x86" if it is a x86 one).

imagex /compress maximum /flags “Ultimate” /capture G: C:\image.wim “Win. 7 Ult. x86 - Off. 2007”
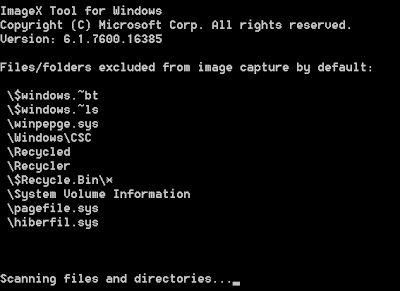
- wait for the process to finish


3/ Configure the WIM server
- tip: the boot.wim is located in the sources folder which is at the root level of the iso.
- the image.wim is the one we just created before


4/ Enjoy your deployment!

The idea beyond this article is to have a virtual machine which we can freely improve, thanks to a snapshot hierarchy. And as soon as a new master is ready, simply publish it as a new Windows Deployment Services entry.

Sunday, December 20, 2009

November 2009 hacking attempts on my websites

As you probably already know, I am maintaining several websites (Hotel-Medicis, Bazar-Discount, Cordes-Aux-Voix, Athletisme-Grenoble).

Every month I check the hacking attempts on these websites at different levels:
- server
- web application

For the month of November 2009, I detected that:
- 35 unsuccessful root logins via ssh (deferred via sshguard)
- 10 unsuccessful attempts of SQL injection have been made (catched by the SQL module of my Car-Online framework)
- 78 unsuccessful attempts of exploring the files stored on the webserver by playing with URLs

I am now starting to think about all the hacks I did not detect...

Wednesday, December 9, 2009

FIM 2010 RC1 update 2

Update 2 for Forefront Identity Manager 2010 RC1 was publicly released yesterday on windowsupdate.
This patch applies to:
- the FIM synchronization service
- the FIM service

Before installing these optional updates:
- stop the FIM service
- stop the FIM synchronization service

Additionaly, you have to apply these updates in the following order:
- FIM 2010 RC1 update 2 for FIM SERVICE
- FIM 2010 RC1 update 2 for FIM SYNCHRONIZATION SERVICE

Since the update 1 failed if we used a non self signed certificate, altough I was not sure it was necessary, I did the temporary certificate replacement before Forefront Identity Manager 2010 RC1 update 1 trick.

It ows the KB977312. You can check details on the Microsoft Support website.
I advise you to read this article on Jorge's blog.


How to install the FIM RC1 2010 Update 2 with a custom certificate:

1. Back up the FIM Service database.
2. Start regedit, and navigate to \HKEY_LOCAL_MACHINE\SYSTEM\CurrentControlSet\Services\FimService. Find the value for CertificateThumbprint, and save it for later use.
3. Uninstall the FIM Service and Portal.
4. Reinstall the RC1 version of the FIM Service and Portal, with the options Re-use existing database and Use self-issued certificate. This allows the FIM Service installer create the certificate.
5. Install FIM 2010 RC1 Update 2.
6. After installation is complete, start regedit, and navigate to the registry key \HKEY_LOCAL_MACHINE\SYSTEM\CurrentControlSet\Services\FimService. Change the value of CertificateThumbprint to the value that you saved previously.
7. Restart the FIM Service.

Friday, November 20, 2009

Windows 2008 R2 Administration tools


If you are running a Windows 7, you probably heard about the Remote Administration Tools for Windows 7. But what about the server version?

Well guys running a Windows 2008 R2 OS do have this pretty powerfull powershell module called "ServerManager":


Import-Module ServerManager
$mod = Get-Module ServerManager
$mod.ExportedCmdlets


When we run the Get-WindowsFeature cmdlet, a list of all the Windows features that could be installed is shown. Each checked box means the feature is alredy installed.


In particular, we do have a list of windows features, which their name is prefixed with "RSAT", which means Remote Server Administration Tools. And it is the same features than the package mentionned above for Windows 7.


I needed to install only the Hyper-V administration tools:

Add-WindowsFeature RSAT-Hyper-V


Done!


I am now able to list my virtual machines:


Wednesday, November 18, 2009

FIM - execute management agents run profiles with powershell

Here is a script I created which permits an easy automatic execution of certain FIM MA run profiles.

Here is an example of output:


And here is the source code:
------------------------
# @author: Fabien Duchene
# @mail: fabien.duchene1 **at** googlemail.com

############
# PARAMETERS
############
$params_ComputerName = "." # "." is the current computer
$params_delayBetweenExecs = 30 #delay between each execution, in seconds
$params_numOfExecs = 0 #Number of executions 0 for infinite
$params_runProfilesOrder =
@(
@{
type="Forefront Identity Management (FIM)";
profilesToRun=@("Full Import";"Full Synchronization");
};
@{
type="Active Directory";
profilesToRun=@("Full Import";"Full Synchronization";"Export");
};
);

############
# FUNCTIONS
############
$line = "-----------------------------"
function Write-Output-Banner([string]$msg) {
Write-Output $line,("- "+$msg),$line
}


############
# DATAS
############

$MAs = @(get-wmiobject -class "MIIS_ManagementAgent" -namespace "root

\MicrosoftIdentityIntegrationServer" -computername $params_ComputerName)
$numOfExecDone = 0


############
# PROGRAM
############
do {
Write-Output-Banner("Execution #:"+(++$numOfExecDone))
foreach($MATypeNRun in $params_runProfilesOrder) {
$found = $false;
foreach($MA in $MAS) {

if(!$found) {
if($MA.Type.Equals($MATypeNRun.type)) {
$found=$true;
Write-Output-Banner("MA: "+$MA.Type)
foreach($profileName in $MATypeNRun.profilesToRun) {
Write-Output (" "+$profileName)," -> starting"
$datetimeBefore = Get-Date;
$result = $MA.Execute($profileName);
$datetimeAfter = Get-Date;
$duration = $datetimeAfter - $datetimeBefore;
if("success".Equals($result.ReturnValue)){
$msg = "done. Duration: "+$duration.Hours

+":"+$duration.Minutes+":"+$duration.Seconds
} else { $msg = "Error: "+$result }

Write-Output (" -> "+$msg)
}
}
}
}
if(!$found) { Write-Output ("Not found MA type :"+$MATypeNRun.type); }
}

$continue = ($params_numOfExecs -EQ 0) -OR ($numOfExecDone -lt $params_numOfExecs)
if($continue) {
Write-Output-Banner("Sleeping "+$params_delayBetweenExecs+" seconds")
Start-Sleep -s $params_delayBetweenExecs
}
} while($continue)

Sunday, November 15, 2009

Mac OS X: automator: create a new file

In a Windows OS, it is really simple to create a new text file: right-click > New > Text file.

On my dear Macbook Pro, it is still not out-of-the-box.
Hopefully Automator is here to fill the gap.Please note that this method does not require additional software. Only standard Mac OS X components are used.

First let's have a look at the final result:

1/ Right click on the folder in which you want to create a new file, and select "New file"


2/ Type the name of the file. For example: New file.txt or New file.docx


3/ The file is automatically created inside the folder we specified before and after opened in your favorite editor.


Now let's integrate this to your Mac OS X system.

- First method. the easy one:
- download the automator workflow. It is stored on my skydrive: Mac OS X Create a new file
- install it on your mac: put this file into the ~/Library/Services/ folder
- open it. (it will be opened within Automator)
- Press Cmd+S or click File > Save to register it within the Contextual menu
- Close automator

- Second method. Create an automator workflow according to these instructions:
- Launch Automator.app located in the Applications folder.
- Create a new Service


- File > Save or Cmd + S

- Here is an overview of the workflow:


As you can see:
- this Service Workflow receives Folder as input and is only available in Finder
- we will also need 2 variables: "Filename" and "Path"

Here is the detail of the workflow:
- Once this is done, just press Cmd + S to save it and register this service within the Finder.app


Enjoy this new file creation!

Saturday, November 14, 2009

Disable Exchange 2010 arbitration mailboxes

For the purpose of my Forefront Identity Manager 2010 RC1, I had to use to Exchange 2007 instead of Exchange 2010 I was using (because at this stage FIM RC1 does not yet support Exchange 2010, but this is planned).

Here are the steps to achieve this:

- First you have to disable all users mailboxes in the Exchange 2010 Management console.

- Then you have to remove the Arbitration mailboxes.
Here is the script I created to remove them:

Foreach($mbdb in Get-MailboxDatabase) {
$mailboxes = Get-Mailbox $mbdb.Name -Arbitration
$mailboxes Disable-Mailbox -Arbitration
$mailboxes Remove-Mailbox -Arbitration -RemoveLastArbitrationMailboxAllowed
}


NOTE: (please add a "pipe" after the two last $mailboxes. This stupid blogspot does remove them!)

For more details about arbitration mailboxes, please check this blog: http://chrislehr.com/2009/10/exchange-2010-what-is-arbitration.htm