Sunday, July 18, 2010

virtual-win-lab-mgmt is now open-source

virtual-win-lab-mgmt permits an easy virtual lab deployment and management in a minimalist Hyper-V environment: even without an Active Directory domain or without tools such as SCVMM.

Initially developped within 3 days, virtual-win-lab-mgmt already was 900+ PowerShell SLOC long. This tool was widely used for preparing and managing the virtual labs of the Microsoft TechDays 2010, Paris, France.

This project is hosting on the Google Code repository.
Link: https://code.google.com/p/virtual-win-lab-mgmt/


Saturday, July 17, 2010

Secure and easy ucarp ip-failover using ucarp-multi

ucarp-multi is an extension to the ucarp package, providing an easy way to set-up ipv4 failover within several hosts, and for several sub-interfaces.

This package is hosted on https://code.google.com/p/ucarp-multi/

Thursday, July 1, 2010

Voyage-Sncf: security design flaw

Voyages-sncf.com, the trip reservation website of the main french rail company, is one the most important websites on the french IT market. Each day seven thousands of train tickets are bought on that precise website.

How crazy is it that my browser was telling me "This is a non-secure form".. blabla (see the screenshot above)?
Since I already was on an https webpage, I figured the form was sent unencrypted...


It would be too much unbelievable to be true. Maybe is-it a Safari bug?
However, after having a quick look at the source code, - by the way please double check the highlighted URL - where the form is submitted:

This is just crazy! The form is sent to an uncrypted webpage (the URL does start with http:// and not https://) After some recent privacy issues with a lot of names released cause of a lack of security issue, I just find it unbelievable such lack of rigor in the way programmers did build this application.


Tuesday, June 29, 2010

Random thoughts to improve voice recognition

As stated once more, and this time on this ITWorld article, relative to Google making Google Voice available to SMB, improvement still has to be done on the voice recognition topic.

More and more editors already did add a voicemail to email transcript service. A service, of which precision is not really the main concern: sometimes even numbers are not correctly recognized!

Just a thought on that topic, maybe researchers could:
- add several noise filters
- recognize the language
- recognize the accent
- build a recognition model for each language and for each accent, or at least a global model for each language, and a global one for each accent
- train these models on a representative set


Monday, June 7, 2010

DNS dynamic secure updates credentials

As soon as Windows Server 2003, Microsoft introduced the DNS dynamic secure updates.
This mechanism permits authorized hosts such as DHCP servers, for instance to update DNS entries, thus resulting in a lot of "automatically-managed" DNS records. Thus reducing the amount of manual administrative tasks.

In order to configure this mechanism:
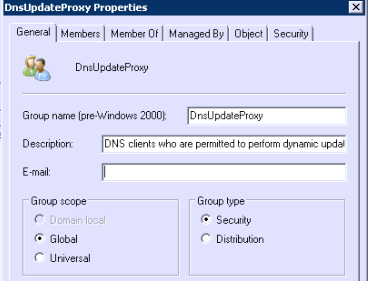
1/ create an update account, member of the DnsUpdateProxy security group

By default, the DnsUpdateProxy security group is located under the container Users of your domain.

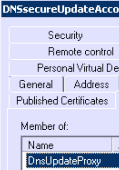
In my example, I created an account named DNSSecureUpdateAccount.
You then have to update its group membership to set it as a member of the DnsUpdateProxy security group.

Also keep in mind there are several security consideration regarding the password complexity and the password expiration of this account. You should think twice about these factors.


2/ configure DNS secure updates credentials in the DHCP snap-in
Within the DHCP snap-in:
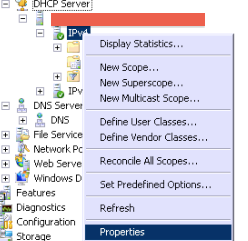
- right-click IPv4
- then go to properties

- then the Advanced tab

- then on the Credentials button, fill in the user account previously created.


3/ enable DNS secure updates
- go to the DNS tab
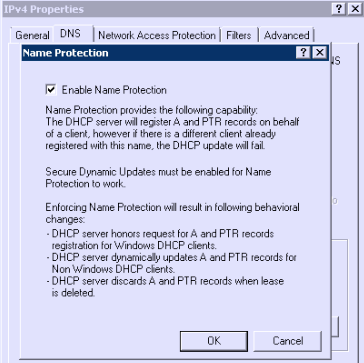
- under "Name Protection", click on the "Configure" button
- then check the box according to the screenshot:

- The DNS tab now does look like:


4/ Only allow dynamic secure updates in your DNS servers
- foreach DNS server:
- within the DNS snap-in:
- navigate to the Forward Lookup Zone, then to your domain
- right click > Properties

- Then under "Dynamic updates" set them to "Secure only"


5/ Enjoy !
Just as a test,
- I turned off a domain computer named vm1 (which was DHCP configured) (actually it was a virtual machine ;)
- then I manually deleted its DNS record on all DNS servers
- I also scavenged the records, and cleared the DNS caches
- nslookup vm1 : no entry
- I then powered it up and did a DNS lookup, and it just worked like a charmed!

Saturday, February 27, 2010

FIM 2010 - Exchange 2010 provisioning made easy with RC1 update 3!

One month ago, FIM RC1 - update 3 was released. Among its various improvements, there is now an official capability for Exchange 2010 provisioning. Before this update, an easy method only did exist for Exchange 2007 mailbox provisioning. Sure with some tricks and a lot of patience, it was also possible to provision Exchange 2010 mailboxes, but it was not really straight forward.

In that post we will see how to provision Exchange 2010 user mailboxes. And we will discover how easy it actually is!


1/ Management tools
When we wanted to provision Exchange 2007 mailboxes, we had to install Exchange 2007 Management Tools on the FIM Sync server. A nice surprise is that there is no such need for Exchange 2010, since the interfacing between the FIM Sync service and the Exchange servers are made using powershell calls over https.

2/ FIM Sync server settings

- launch the Synchronization Service Manager program
- Tools > Options
- then configure the options as shown on the following picture:

- then on the Active Directory Management Agent which will be used for Exchange 2010 provisionning, go to Configure Extensions.

- set "Provision for:" as "Exchange 2010"
- below enter the exchange 2010 RPS URI (something like http://FQDN/powershell )

- then validate


3/ Exchange servers settings
-
the AD user account used for the AD management account which you want to use to provision mailboxes has to own some priviledges on the Exchange infrastructure.
- navigate to the exchange control panel (ECP): http://FQDN/ecp
- Admin Role Groups > Organization Management
- Add the FIM ADDS MA to the "Organization Management Group" (a group with less permissions could also work, but don't have time to check this out, since I am no Exchange 2010 expert. I guess just the permission to create mailbox would be enough)

4/ Synchronization rule
For the sync rule used to initially create or to update AD users, you have to define an Outbound flow for the following AD objects attributes:
- MailNickName
- msExchHomeServerName
- homeMDB

Please note the last two values depends on the exchange 2010 server and database to which you want to create the user mailbox.
If you don't feel comfortable with this, I advise you to get some informations from the Exchange 2007 provisioning with FIM 2010 RC0 webpage.


5/ Done!
-
in order to check if your MPR, Workflow, and sync rule related to provisioning Exchange 2010 user mailboxes works, do the necessary stuff in order for the previously configured sync rule to apply.
- Then after the synchronization process you defined is done, logon as the user you just created
- open Outlook


Friday, February 19, 2010

OVH minicloud: Hello world bench!

INTRODUCTION
The french hosting provider OVH is about to add some cloud related offers:
- minicloud: 1 small virtual machine, but very cheap 1,99euros a month
- coreCloud: 1 to 10 virtual machines instances. 9,99e/month
- myCloud: the most promising offer: 1 to 48 instances for 49,99e/month. You have your own cloud in which you can dynamically create virtual machines, distribute charge, etc..

WARNING: The OVH framework is yet not released. We are still waiting for more details to be provided.

Nothing more except a fixed price is yet provided about billing details.


MINICLOUD PRESENTATION
I had to chance to beta-test the minicloud offer. Basically you have one virtual machine, which only these caracteristics are described:
- OS: Debian 5.0 Lenny 64 bits
- RAM: 512 Mo
- CPU: 1 x64
- HDD: 5 Go


GOING FURTHER
Since we only have one virtual machine available, let us go further by discovering some details about it, and benchmarking it. However, keep in mind that since resources are shared within the cloud virtual machines, the following benchmarks actually depends of the cloud load.


# UNIX BENCH 5.1

========================================================================
BYTE UNIX Benchmarks (Version 5.1.2)

System: v12347.ovh.net: GNU/Linux
OS: GNU/Linux -- 2.6.32.2-xxxx-grs-ipv4-64 -- #1 SMP Tue Dec 29 14:41:12 UTC 2009
Machine: x86_64 (unknown)
Language: en_US.utf8 (charmap="ANSI_X3.4-1968", collate="ANSI_X3.4-1968")
CPU 0: Intel(R) Xeon(R) CPU E5504 @ 2.00GHz (3990.0 bogomips)
x86-64, MMX, Physical Address Ext, SYSENTER/SYSEXIT, SYSCALL/SYSRET
20:06:37 up 1 day, 19:57, 1 user, load average: 0.10, 0.03, 0.50; runlevel 2

------------------------------------------------------------------------
Benchmark Run: Sat Feb 20 2010 20:06:37 - 20:37:55
1 CPU in system; running 1 parallel copy of tests

Dhrystone 2 using register variables 7092797.6 lps (10.5 s, 7 samples)
Double-Precision Whetstone 2344.2 MWIPS (10.0 s, 7 samples)
Execl Throughput 1253.3 lps (30.0 s, 2 samples)
File Copy 1024 bufsize 2000 maxblocks 267298.5 KBps (30.0 s, 2 samples)
File Copy 256 bufsize 500 maxblocks 90045.7 KBps (31.0 s, 2 samples)
File Copy 4096 bufsize 8000 maxblocks 567304.8 KBps (31.0 s, 2 samples)
Pipe Throughput 770806.2 lps (10.8 s, 7 samples)
Pipe-based Context Switching 142454.6 lps (11.1 s, 7 samples)
Process Creation 3915.6 lps (30.3 s, 2 samples)
Shell Scripts (1 concurrent) 1834.1 lpm (60.0 s, 2 samples)
Shell Scripts (8 concurrent) 240.8 lpm (60.2 s, 2 samples)
System Call Overhead 1342105.8 lps (10.9 s, 7 samples)

System Benchmarks Index Values BASELINE RESULT INDEX
Dhrystone 2 using register variables 116700.0 7092797.6 607.8
Double-Precision Whetstone 55.0 2344.2 426.2
Execl Throughput 43.0 1253.3 291.5
File Copy 1024 bufsize 2000 maxblocks 3960.0 267298.5 675.0
File Copy 256 bufsize 500 maxblocks 1655.0 90045.7 544.1
File Copy 4096 bufsize 8000 maxblocks 5800.0 567304.8 978.1
Pipe Throughput 12440.0 770806.2 619.6
Pipe-based Context Switching 4000.0 142454.6 356.1
Process Creation 126.0 3915.6 310.8
Shell Scripts (1 concurrent) 42.4 1834.1 432.6
Shell Scripts (8 concurrent) 6.0 240.8 401.4
System Call Overhead 15000.0 1342105.8 894.7
========
System Benchmarks Index Score 507.1

Surprisingly, this is a pretty good score compared to more expensive cloud offers:
- Amazon: 210
- Slicehost: 295
- Rackspace: 305
- Linode x86_64: 559
- Linode i686: 723


Then let us take some time to discover some features of an OVH minicloud offer:

#OS
root@v12347:~# uname -a
Linux v12347.ovh.net 2.6.32.2-xxxx-grs-ipv4-64 #1 SMP Tue Dec 29 14:41:12 UTC 2009 x86_64 GNU/Linux


#HDD
root@v12347:~# df
Filesystem 1K-blocks Used Available Use% Mounted on
/dev/sda1 5201532 673584 4265808 14% /
tmpfs 1026496 0 1026496 0% /lib/init/rw
udev 10240 2652 7588 26% /dev
tmpfs 1026496 0 1026496 0% /dev/shm

root@v12347:~# hdparm -t /dev/sda1
/dev/sda1:
Timing buffered disk reads: 126 MB in 3.03 seconds = 41.62 MB/sec

root@v12347:~# hdparm -T /dev/sda1
/dev/sda1:
Timing cached reads: 7326 MB in 2.00 seconds = 3664.46 MB/sec


#CPU
root@v12347:~# cat /proc/cpuinfo
processor : 0
vendor_id : GenuineIntel
cpu family : 6
model : 26
model name : Intel(R) Xeon(R) CPU E5504 @ 2.00GHz
stepping : 5
cpu MHz : 1995.001
cache size : 4096 KB
fpu : yes
fpu_exception : yes
cpuid level : 11
wp : yes
flags : fpu vme de pse tsc msr pae mce cx8 apic sep mtrr pge mca cmov pat pse36 clflush dts acpi mmx fxsr sse sse2 ss syscall nx rdtscp lm constant_tsc up arch_perfmon pebs bts rep_good xtopology tsc_reliable nonstop_tsc aperfmperf pni ssse3 cx16 sse4_1 sse4_2 popcnt hypervisor lahf_lm
bogomips : 3990.00
clflush size : 64
cache_alignment : 64
address sizes : 40 bits physical, 48 bits virtual
power management:


root@v12347:~# tiobench --size 384
Run #1: /usr/bin/tiotest -t 8 -f 48 -r 500 -b 4096 -d . -TTT

Unit information
================
File size = megabytes
Blk Size = bytes
Rate = megabytes per second
CPU% = percentage of CPU used during the test
Latency = milliseconds
Lat% = percent of requests that took longer than X seconds
CPU Eff = Rate divided by CPU% - throughput per cpu load

Sequential Reads
File Blk Num Avg Maximum Lat% Lat% CPU
Identifier Size Size Thr Rate (CPU%) Latency Latency >2s >10s Eff
---------------------------- ------ ----- --- ------ ------ --------- ----------- -------- -------- -----
2.6.32.2-xxxx-grs-ipv4-64 384 4096 1 ###### 102.2% 0.001 0.14 0.00000 0.00000 2909
2.6.32.2-xxxx-grs-ipv4-64 384 4096 2 ###### 194.6% 0.002 8.38 0.00000 0.00000 1574
2.6.32.2-xxxx-grs-ipv4-64 384 4096 4 ###### 385.0% 0.005 20.04 0.00000 0.00000 727
2.6.32.2-xxxx-grs-ipv4-64 384 4096 8 ###### 413.6% 0.008 32.05 0.00000 0.00000 774

Random Reads
File Blk Num Avg Maximum Lat% Lat% CPU
Identifier Size Size Thr Rate (CPU%) Latency Latency >2s >10s Eff
---------------------------- ------ ----- --- ------ ------ --------- ----------- -------- -------- -----
2.6.32.2-xxxx-grs-ipv4-64 384 4096 1 ###### 129.6% 0.001 0.03 0.00000 0.00000 1953
2.6.32.2-xxxx-grs-ipv4-64 384 4096 2 ###### 67.56% 0.001 0.04 0.00000 0.00000 3906
2.6.32.2-xxxx-grs-ipv4-64 384 4096 4 ###### 123.8% 0.002 3.41 0.00000 0.00000 1953
2.6.32.2-xxxx-grs-ipv4-64 384 4096 8 ###### 56.57% 0.001 0.04 0.00000 0.00000 3906

Sequential Writes
File Blk Num Avg Maximum Lat% Lat% CPU
Identifier Size Size Thr Rate (CPU%) Latency Latency >2s >10s Eff
---------------------------- ------ ----- --- ------ ------ --------- ----------- -------- -------- -----
2.6.32.2-xxxx-grs-ipv4-64 384 4096 1 39.91 11.80% 0.021 421.55 0.00000 0.00000 338
2.6.32.2-xxxx-grs-ipv4-64 384 4096 2 30.80 29.35% 0.061 2149.02 0.00203 0.00000 105
2.6.32.2-xxxx-grs-ipv4-64 384 4096 4 29.44 52.49% 0.112 2117.31 0.00407 0.00000 56
2.6.32.2-xxxx-grs-ipv4-64 384 4096 8 34.61 50.22% 0.163 5115.43 0.00203 0.00000 69

Random Writes
File Blk Num Avg Maximum Lat% Lat% CPU
Identifier Size Size Thr Rate (CPU%) Latency Latency >2s >10s Eff
---------------------------- ------ ----- --- ------ ------ --------- ----------- -------- -------- -----
2.6.32.2-xxxx-grs-ipv4-64 384 4096 1 16.75 2.572% 0.005 1.64 0.00000 0.00000 651
2.6.32.2-xxxx-grs-ipv4-64 384 4096 2 44.54 9.122% 0.005 4.06 0.00000 0.00000 488
2.6.32.2-xxxx-grs-ipv4-64 384 4096 4 40.43 18.63% 0.007 10.73 0.00000 0.00000 217
2.6.32.2-xxxx-grs-ipv4-64 384 4096 8 18.86 -13.5% 0.003 0.63 0.00000 0.00000 -140


# RAM
Not tested.

# NETWORK (not really representative)
# using iperf from a RPS limited to 100Mbit/s
[ 3] 0.0-10.0 sec 113 MBytes 94.7 Mbits/sec
# ideally I would have to rent another minicloud to check the effective performance (because I guess it is limited by my RPS). I guess result would be closer to 10Gb/s or 1Gb/s


Thursday, February 18, 2010

Getting the latest Metasploit 3.3 branch to work on Mac OS X 10.6.1 (Ruby 1.9.1)

A very basic post just to help new users getting Metasploit to work with the latest OS X version:


- RUBY
cd ~/Desktop/
mkdir ruby
cd ./ruby
- Download the latest Ruby stable svn snapshot (at the time I am writing this article, it is 1.9.1) svn co http://svn.ruby-lang.org/repos/ruby/branches/ruby_1_9_1
- Compile it:
cd ruby_1_9_1
autoconf
./configure --enable-pthread
make
make test
sudo make install
cd ./../../
rm -rf ./ruby
ruby -v
ruby 1.9.1p420 (2010-02-04 revision 26571) [i386-darwin10.2.0]


- METASPLOIT
cd ~/Desktop/
mkdir msf
cd msf


- download either the latest stable version:
wget http://www.metasploit.com/releases/framework-3.3.3.tar.bz2
- or the latest dev version:
svn co https://www.metasploit.com/svn/framework3/trunk/
cd trunk
./msfconsole


ENJOY!


Sunday, February 7, 2010

Techdays 2010, France - My selection

Here is my selection for this 2010 edition of the Techdays in France which is about to occur on Feb 8th, 9th and 10th 2010:


I will also be present as a speaker at the following sessions:
- Forefront - Microsoft vision of an integreated security system
- Workshop - give a try to the new Forefront Identity Manager 2010 features
- Workshop - Secure messaging with Forefront Protection for Exchange Servers 2010
- Forefront Identity Manager 2010 - Smart cards management
- Forefront Protection for Exchange Servers 2010


Hope to see you there!

Tuesday, January 19, 2010

Enable DEP using GPO and Powershell

As a response to recent security threats, it is highly advised to enable Data Execution Prevention (DEP). However, how to succeed in such a goal using group policy?

Why is there no administrative template for enabling DEP?

The DEP setting is defined inside the boot.ini file.
Thus it is not as simple as setting a registry value.
In addition, we have to be aware of the following issues:
- on windows XP, there is no command such as bcdedit, thus you will have to write an additional appropriate script to the one described here. This is really risky, since if the boot.ini is badly formatted, the system just will not boot anymore!
- on windows Vista, enabling it will break Bitlocker.
- on Windows 7, no problem. First of all, DEP is enabled as default, but you since you are reading this post, you probably want to enforce it.

How to enable DEP on a single computer?

A lot of websites already cover this topic.
They do not explain it is possible to define the DEP enhancement using command line: (as an administrator)
%windir%\system32\bcdedit /set nx [MODE]
where [MODE] is either: {AlwaysOff; AlwaysOn; OptOut;OptIn}

- AlwaysOff : This does not provide any DEP coverage for any part of the system, regardless of hardware DEP support. The processor will run in PAE mode with 32-bit versions of Windows unless the /NOPAE option is also present in the boot entry.

- AlwaysOn : This provides full DEP coverage for the entire system. All processes always run with DEP applied. The exceptions list for exempting specific applications from DEP protection is not available. System Compatibility Fixes (“shims”) for DEP do not take effect. Applications which have been opted-out using the Application Compatibility Toolkit run with DEP applied.

- OptOut : DEP is enabled by default for all processes. Users can manually create a list of specific applications which do not have DEP applied using System in Control Panel. IT Pros and Independent Software Vendors (ISVs) can use the Application Compatibility Toolkit to opt-out one or more applications from DEP protection. System Compatibility Fixes (“shims”) for DEP do take effect

- OptIn : On systems with processors capable of hardware-enforced DEP, DEP is enabled by default for limited system binaries and applications that “opt-in"

How to enable DEP on a domain?

Please note:this is one possible solution for Windows Vista and Windows 7 computers.
1/ install the powershell feature on windows vista versions (it cannot be removed on windows 7)

2/ use startup scripts to enable Unrestricted execution policy for powershell scripts:
- Create a GPO
- navigate to Computer configuration > Policies > Windows settings > Scripts (startup / shutdown)
- add a command startup script: "powershell set-execution policy unrestricted"

3/ add this powershell script inside the Machine>scripts>startup folder of the GPO:
###############
$winver = (Get-WmiObject Win32_OperatingSystem).version
$WIN_VISTA = 6
$MODE = "AlwaysOn" #of whatever DEP option you want to set
###############
if($win -lt $WIN_VISTA) { #code for windows XP
# write your own script editing the bcdedit

} else if ($win -eq $WIN_VISTA) { #code for windows vista
# check if bitlocker is enabled. see the bitlocker manipulation using powershell link below
# if bitlocker is disabled, then enable DEP

} else { # win 7 and greater
%windir%\system32\bcdedit /set nx $MODE

}
###############


References
- my colleague Pascal Sauliere for his advises regarding DEP related issues on Windows XP and Vista.

Sunday, January 10, 2010

Administrative template for Microsoft Security Essentials

Microsoft security essentials market

Small and very small home businesses usually do not need powerfull features such as protection analysis, but also NAP and SCCM integration provided by Microsoft Forefront Protection Suite 2010

In that case, it is economically more interesting to use Microsoft Security Essentials. This antispyware, antimalware, antirootkit Microsoft software is available for free since the 29th September of 2009.

Microsoft Security Essentials administrative template

However, if you are an IT administrator of your home-based business, manually configuring MSE settings for each desktop could be a pain in the head, because MSE does not support Group Policy settings. A workaround to this problem is to use the administrative template for Microsoft Security Essentials I created.

How is it achieved?

Well, keep in mind this solution is not as powerfull as a classic group policy administrative template, first because Security Essentials does not support group policy settings. It means we can not enforce settings in the same way we can with Forefront EndPoint protection. This administrative template actually applies registry values under HKLM\Software\Microsoft\... instead of HKLM\Software\Policies\Microsoft


What are the limitations?

Since MSE does not support group policy settings, it basically means an administrator / end-user would be able to change some settings inside the MSE User Interface. Of course, the settings defined inside the group policy containing this administrative template would be applied again each time a group policy update would be run, but this solution does not permit a precise control over settings such as Forefront Protection Suite 2010 does.

To conclude

Still it is pretty efficient to define Microsoft Security Essentials settings for several computers.

Going further

If you are interested in writing your own administrative templates for Active Directory, I advise you to check the Introduction to Windows 2000 group policy whitepaper. It really is a good start in order to create custom classic administrative templates.

RSync for Windows: cwrsync

RSync is a very popular backup software in the Unix world. Unfortunately, there is no native port of it. An alternate answer would be cwrsync. It comes as a single installer containing a minimal cygwin x86 set, and the latest x86 compiled Rsync.

Integration with Windows server
The installer setups a new classic windows service:
Since its a service, we have to choose a user account for running it. This permits controlling very precisely the permissions the rsync user will be granted.

Permissions, privileges
In my example, I wanted to perform an incremental backup solution using dirvish (which relies on rsync) on the linux server. That is why I only needed READ permissions for the account backupsvc (and since it is also a service account, the right Logon as a service also has to be granted):

RSync shares configuration
You then have to define "shares" (similarily to smb). In our example, the share is named "test", and it points to the folder C:\Shares
We assigned read-only = true, for the rsync server not to try to write anything to the share. Note: if we would have set it to false, we however could adjust this thanks to NTFS permissions.
Transfer logging is especially important when your rsync synchronization fails.
hosts allow is not really usefull, since we will control this later using the Windows Firewall.


Network security
From the RSync Wikipedia article it binds by default on TCP 873, but also UDP 873.
The Windows Firewall with Advanced security lets us control precisely the remote IP initiating a connection to the rsync server.


Running processes
Once the Rsyncserver service is started, there are 3 processes running under the account previsouly defined:
- conhost: for the service to be controlled as a classic windows service.
- cygrunsrv.exe*32 : Cygwin environnment
- rsync.exe*32: rsync service

Please note that these processes are only x86 processes at the time I am writing these lines.


Watchout
You have to be carefull on:
- permissions on files/folders to be backed up
- permissions/rights granted to the service running the rsync server service
- firewall rule
- rsync config file


Finally
From a debian server:

Going further
If you are interested in setting up an incremental backup on a debian server, I advise you to check the dirvish and rsync websites.

Wednesday, January 6, 2010

Disabling Adobe Javascript using GPO

Since the recent highlighted Adobe Acrobat PDF security issues, especially
- APSA09-07 in which Adobe advised to disable Javascript (until a patch would be released on the 12th of January 2010!)

A lot of domain administrators / security administrators are searching for a way to mass disable the Adobe Javascript.
This is one easy solution to mitigate most of the heap spray attacks using Adobe Javascript. But recently, a PDF exploit not using Javascript was successfull.

As far as I know, here are several answers to mitigate that problem, including:
- Using a third party PDF reader such as FoxIt Reader
- Using Adobe Customization Wizard to customize Adobe applications before deploying them
- Using GPO to set registry values disabling Adobe Javascript

I will present the third one:

Using GPO to disable Adobe Javascript

1/ Create an administrative template file.
On a DC, navigate to %windir%\inf

2/ create a new Text file "adobe.adm"

3/ Fill it with the following content: (don't forget to add a return line after the END CATEGORY item)


CLASS USER

CATEGORY "Adobe Acrobat/Reader 9.x"

POLICY "JavaScript Reader 9.x"
KEYNAME "Software\Adobe\Acrobat Reader\9.0\JSPrefs"
EXPLAIN "Enable or Disable JavaScript in Acrobat Reader 9.x"
VALUENAME "bEnableJS"
VALUEON NUMERIC 1
VALUEOFF NUMERIC 0
END POLICY

END CATEGORY


4. Create a new GPO,
- Navigate to User Configuration > Policies > Administrative Template
- Then add the adobe.adm template file we previsouly created.
- and select "Disabled" for the Javascript Reader 9.x settings:


5. Close the GPM editor

6. As a user member of the security group / OU on which you choosed to apply the GPO:
- close Acrobat Reader 9.0
- gpupdate /force
- open Acrobat Reader 9.0, Edition > Preferences > Javascript

And as you can see, Javascript is now disabled!

Et voila!