A lot of topics discuss about the process of converting VIM files to VHD, but very few about VHD to WIM.
Virtual Hard Disk (.vhd) is the file format of virtual machines hard disk drives. Connectix and Microsoft are currently using this technology. You can check the Virtual Hard Disk Image Format Specification for more details.
Windows Imaging Master (.wim, .swm) is the file format for deploying Windows OSes since the XP version.
The goal of this post is to explain how to produce a WIM master file after having prepared a VHD master.
1/ prepare the virtual machine master
- install the OS, the program you want to use
- in case you would like to perform a unattended installation, I advise you to check the Sysprep a Windows 7 Machine - Start to finish post.
- sysprep with appropriate commands
2/ convert the virtual machine VHD to a VIM
2.1/ if you used at least 1 snapshot (avhd): (if not, go to 2.2), we have to produce a single VHD file.
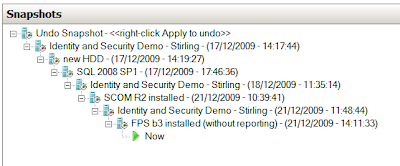 When using snapshots, it creates a tree of virtual machine states. The root node (the root "-" sign) is a VHD, and each icon is a AVHD storing the differences made regarding the parent disk.
In our example, we have a total of 8+1 avhd files. (8 snapshots, and the final state).
The problem is that, on windows 7 / 2008R2, we are currently only able to mount a VHD.
If you do not want to loose your snapshots, you have to perform:
2.1.1/ Virtual machine export

2.1.2/ Virtual machine import

2.1.3/ Snapshots merging
- Click on the root snapshot: delete > snapshot subtree

- wait for the merging operation to finish


- your vhd is now ready to be mounted in your host system!
2.2/ Mount the VHD (as read only) in your host system
- start > Run > diskmgmt.msc
- Action > Attach VHD. Then:
- check Read-Only
- select the vhd we just produced and notice its assignated letter. Let us assume that it has the letter G: assigned.
As a local administrator, open a command prompt:
cd "%programfiles%\Windows AIK\Tools\amd64"
(assuming that your host system is x64 Windows OS, or cd "%programfiles%\Windows AIK\Tools\x86" if it is a x86 one).
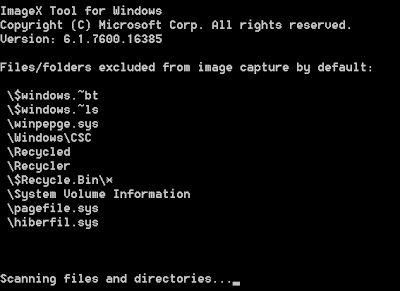
imagex /compress maximum /flags “Ultimate” /capture G: C:\image.wim “Win. 7 Ult. x86 - Off. 2007”
 - wait for the process to finish
3/ Configure the WIM server
- tip: the boot.wim is located in the sources folder which is at the root level of the iso.
- the image.wim is the one we just created before
4/ Enjoy your deployment!

The idea beyond this article is to have a virtual machine which we can freely improve, thanks to a snapshot hierarchy. And as soon as a new master is ready, simply publish it as a new Windows Deployment Services entry.
